Working with Pimcore Image Thumbnails: A Developer's Guide
Learn how to enhance your web projects with Pimcore's image thumbnail feature. This developer's guide provides step-by-step instructions and code examples for creating, customizing, and utilizing image thumbnails in Pimcore. Discover how to dynamically generate and manipulate images to boost performance and user experience on your website.
Pimcore is a robust content management system that excels at handling various types of assets, including images. One powerful feature for developers is the ability to generate and manipulate image thumbnails easily. In this article, we'll explore how to work with Pimcore image thumbnails with code examples to help you harness this feature for your projects.
Introduction to Pimcore Image Thumbnails
Pimcore's image thumbnail feature allows you to dynamically create and manipulate image variations, known as thumbnails, from the original source image. These thumbnails are often used to optimize images for different devices and screen sizes or to generate different image sizes for specific parts of your website.
Here's a step-by-step guide on how to work with Pimcore image thumbnails:
Step 1: Upload an Image
Before creating thumbnails, you need to upload an image to Pimcore. You can use the Pimcore admin interface or the API to achieve this. For this example, let's assume you've uploaded an image with the ID "1".
Step 2: Create Thumbnail Configurations
Thumbnail configurations define the rules for generating thumbnails. You can specify the size, quality, and other parameters for each configuration. These configurations can be created in Pimcore's admin panel under .
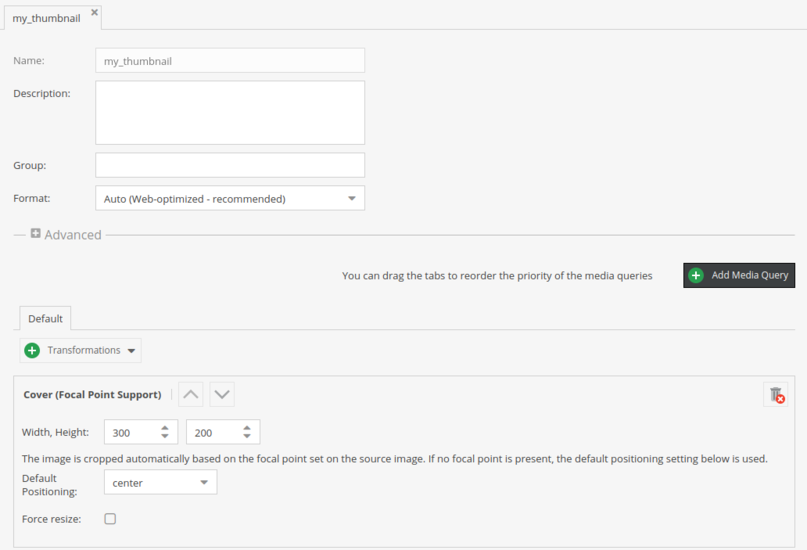
Let's create a thumbnail configuration named "my_thumbnail" with the following parameters:
- Width: 300 pixels
- Height: 200 pixels
- Mode: Cover (Focal Point Support)

Step 3: Generate Thumbnails in Code
Now, let's generate thumbnails for the image using the "my_thumbnail" configuration in your php file:
In this code:
- We load the image by its ID.
- Check if the image exists.
- Generate the thumbnail using the specified configuration.
- Get the URL of the generated thumbnail.
- Finally, we display the thumbnail in an HTML img tag.
$image = \Pimcore\Model\Asset\Image::getById(1);
if ($image instanceof \Pimcore\Model\Asset\Image) {
    $thumbnail = $image->getThumbnail('my_thumbnail');
    $thumbnailUrl = $thumbnail->getPath();
    echo $thumbnail->getHtml();
}
Step 4: Using Thumbnails in Templates
You can use these generated thumbnails in your templates to display the images. Here's an example of how you can use the generated thumbnail in a template:
{% set image = pimcore_asset(1) %}
{% if image instanceof "\\Pimcore\\Model\\Asset\\Image" %}
    {{ image.thumbnail("my_thumbnail") }}
{% endif %}

{# or in an image editable #}
{{ pimcore_image('my_image_editabel', {thumbnail: 'my_thumbnail'}) }}
Conclusion
Working with Pimcore image thumbnails is a powerful way to optimize and manipulate images in your web projects. It allows you to create different image sizes and variations to improve performance and user experience. By following the steps outlined in this article and using the provided code examples, you can harness the capabilities of Pimcore's image thumbnail feature for your web development needs.
Comments (0)
-
No Comments
